During technical maintenance of BOEING 737 -300, -400, -500 planes (hereinafter referred to as B737) ultrasonic technique of non-destructive testing is widely used (hereinafter referred to as UST). Inspections with the application of UST are carried out both once and from time to time. Date and periodicity are indicated in service bulletins, warning service bulletins and FAA airworthiness guidelines.
"Ukrainian International Airlines" airline (UIA) have already accumulated certain experience of UST execution during airliners operation. Inspection is performed using UD4-76 and UD3-71 universal ultrasonic flaw detectors (produced by "Ultracon-Service" production association and "PROMPRYLAD" LLC, Kiev) with the application of both foreign and domestic probes in accordance with the requirements of technologies/techniques stated in B737 plane NDT manual – NDT Manual. Domestic and foreign probes have been analyzed on the elements/components of B737 plane construction. The probes produced by "Ultracon-Service" production association have been manufactured in compliance with the requirements stated in various testing technology parts of B737 plane NDT Manual.
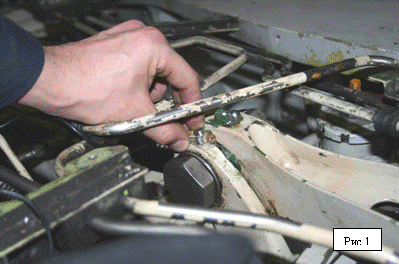
To test the areas of two ears of "Actuator Beam Arm" landing gears component parts, P111-5-P6-ММ-003 (produced by "Promprylad" LLC) and SUC169 (produced by NDT Engineering) probes were used which were set up on NDT3023 standard/reference piece (NDT Engineering). The piece is made from steel 4340 (М). Setup on the mentioned piece is carried out by two defects, such as "groove" 2,0 (3,18) mm in length, 1,0 (1,3) mm in depth and up to 0,25 (0,17) mm in opening. «Actuator Beam Arm» is considered to be defective with the occurrence of signal occupying 30% of the screen height and more and locating in the space between 55 % and 90 % of the screen width. The signals from crack should also move horizontally with amplitude increase (decay) as the probe moves.
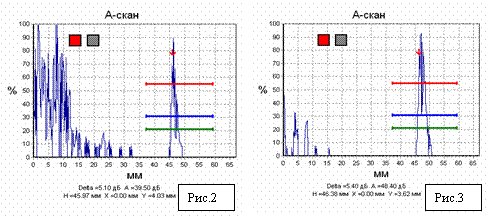
When setting up the probe using UD3-71 flaw detector, P111-5-П6-ММ-003 probe required less gain in comparison to SUC169 probe on the stated sample in other equal conditions and instrument setups values, though noise characteristic in the initial pulse area (beyond the testing area) was bigger what doesn't influence UST carrying out quality.
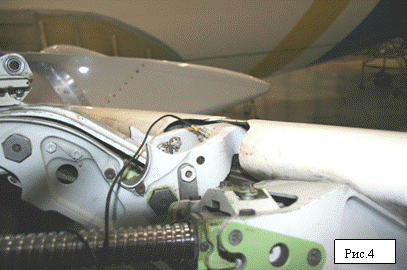
To test the spindles of slide assemblies placed on the middle section of outer plane flap (fig.4), P111-5-P6-ММ-004 probes with a special profile wedge (produced by "Promprylad" LLC) and SUC 166-8T probes (produced by NDT Engineering) which have been set up on NDT3038 standard/reference piece NDT3038 (NDT Engineering) were used.
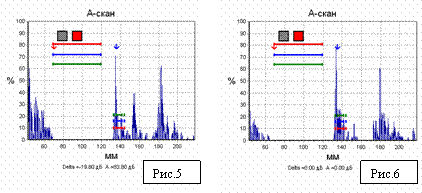
The piece is made from steel 4330 or 4340(М). Setup on the mentioned piece is carried out by the bottom signal and by the signal from hole which simulates the hole for bolt of spherical spindle bearing. The slide assembly is considered to be defective with the occurrence of signal occupying 80% of the screen height and more and locating in the space between 22% and 45% of the screen width to the signal from defect locating between 51% and 55% of the screen width. P111-5-P6-ММ-004 (fig.5) and SUC 166-8T (fig.6) probes generated approximately the same amplitude values with other equal values of UD3-71 flaw detector setups. Concurrently, P111-5-P6-ММ-004 probe had a little bit more reverberation noises in the initial pulse area, thereby, the testing area is situated in the range of 70-180 mm.
To inspect the wall of front plane pressure bulkhead in the areas under boom/reinforcement sheets and angles, SUM 1070AS probes (produced by NDT Engineering) and special-purpose P121-10-70-ММ-005 probe quickly developed and produced by "Promprylad" LLC were applied. The probes were set up on NDT3001 standard/reference piece (NDT Engineering), which is a plate made from aluminum alloy of 2024 grade with thickness of 0,81 mm. Surface wave which is reflected from the edge simulating a rack in this case is generated in the piece. Testing technique enables to detect cracks at the distance of About Us 28 mm from the front probe edge. Acceptance criterion is the occurrence of the signal with amplitude of more than 50% of the screen height in the range of 28 - 90 % of the flaw detector screen width. P121-10-70-ММ-005 (fig.8) and SUM 1070AS (fig.7) probes produce approximately the same amplitude values with other equal values of UD3-71 setups.
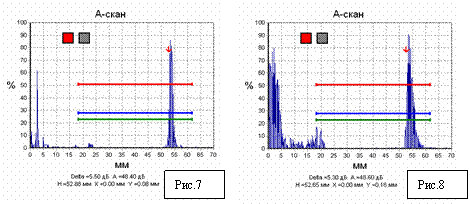
Upon that, P121-10-70-ММ-005 probe had a slightly greater reverberation-noise characteristic at more optimal configuration and higher wear resistance of operating probe surface what is a very important factor for execution of ultrasonic testing of pressure bulkhead wall surface.
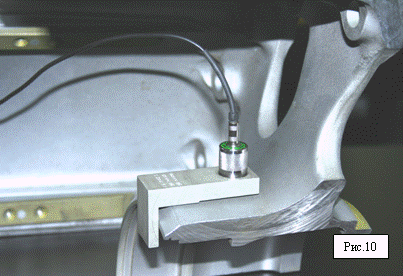
To test the webs of main plane wheels for cracks presence in the area of pressed-out bearing outer race, "Promprylad" LLC manufactured two P111-5-P8-R-003 probes (fig.9) and one P111-5-P8-R-005 probe (fig.10) which are put in special holders for testing.
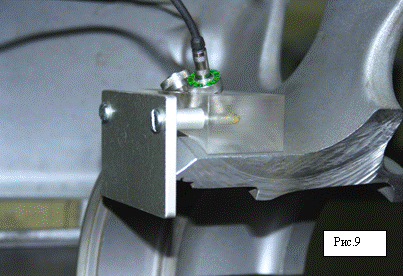
Testing technique, probe holder type and standard/reference piece design are indicated in Honeywell wheels maintenance manual (drawing no. 2606671 and drawing no. 2609801). For inspection which is carried by the outer web diameter it is not necessary to demount the wheel and press out the bearing outer race. Setup on the piece is performed by two defects, such as "groove" 3,56 ± 0,05 mm in length, 1,02 ±0,05 mm in depth and 0,1 ± 0,05 mm in opening, and also by the (bottom) signal reflected from wall. Testing is carried out using UD4-76 universal ultrasonic flaw detector produced by "Ultracon-Service" production association. Due to complex and quick solution of special-purpose equipment development and manufacture for UST of wheel: – standard piece (fig.9-10), special positioning wedges, probes and holders for them – probes and standard pieces of foreign production have not purchased and comparative analysis has not performed for this inspection.
All above-listed equipment produced by "Ultracon-Service" production association and "Promprylad" LLC allows to test the wheel web in full in conformity with the requirements of Honeywell wheels maintenance instruction (drawing no.2606671 and drawing no.2609801) for Boeing 737 -300, - 400, -500 planes.
Ultrasonic testing with the application of domestic equipment gives good results what enables its manufacturer to enter foreign markets of such products and compete with leading world manufacturers of NDT tools at more moderate prices. During operation of the present instrument the following factors are not the least of the factors for native consumers: – personnel training, complex solution of issues connected with the equipment introduction, professional advises, on-line after-sale service.
Products used for this application
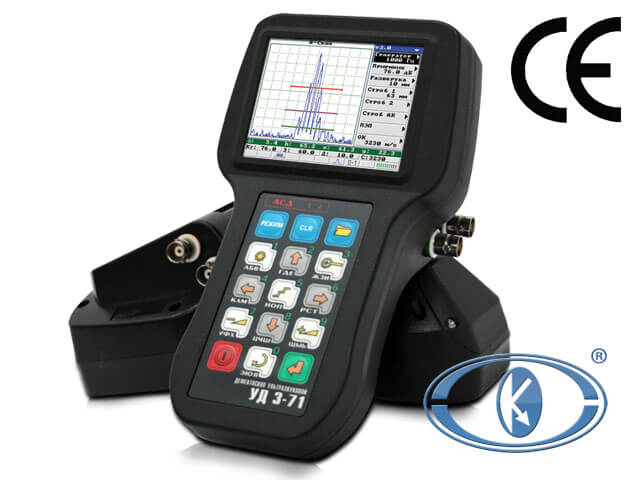
UD3-71 ultrasonic portable flaw detector
UD3-71 ultrasonic flaw detector provides the testing of weld joints and base materials, and also thickness measurement of monometals, bimetals in correspondence with the regulatory documents requirements in various industrial sectors.

UD4-76 ultrasonic flaw detector-tomograph
UD4-76 universal ultrasonic flaw detector-tomograph with large high-contrast TFT display is intended for products testing for detection of defects, such as discontinuity and inhomogeneity of materials, goods and in-process goods, weld joints, measurements of signals amplitude ratio from defects, of depth and their depth coordinates.

